
The Warlock Of Firetop Mountain released in 1982 was the first in the popular series of Fighting Fantasy Gamebooks and for many people in the UK it was their gateway into the world of RPGs. it was renowned for its difficulty, particularly the infamous Maze Of Zagor section where many players found themselves completely lost.
It’s very much in the style of early Dungeons And Dragons scenarios where you wander round a dungeon full of random inhabitants and there really isn’t much logic to anything. The plot doesn’t amount to much beyond hearing some rumours that the dungeon beneath Firetop Mountain is home to a powerful warlock who owns lots of treasure therefore you’re going to go and kill everything. Sophisticated plots would have to wait until later books in the Fighting Fantasy series.
Here’s a guide to how to make it through this classic adventure…
Rolling Your Character
In the Hints On Play section at the start of the book it will tell you that any character can make it through the adventure with minimal risk no matter how bad their stat rolls were. In some Fighting Fantasy gamebooks this is indeed the case. Warlock Of Firetop Mountain is not one of those gamebooks.
Obviously the higher your stats are the better but realistically a character with SKILL 7 or 8 isn’t going to make it. Even SKILL 9 characters might struggle a bit. Ideally you want a character with at least SKILL 10. High STAMINA and LUCK will make a significant difference to the chances of survival for characters with low SKILL but if you’ve rolled an 11 or 12 for SKILL then it probably won’t matter much if your STAMINA and LUCK rolls are low.
You have a choice of potion to take on your adventure. Pick either the Potion of Strength or the Potion of Fortune.
The Potion of Skill is a waste of time. There aren’t many places where you will lose SKILL points and they are all either easily avoided, or there are other ways to recover the lost SKILL points. THe only reason to take this potion is if you are playing the game completely blind.
The Potion of Strength is particularly useful for low SKILL low STAMINA characters. Some Fighting Fantasy gamebooks stipulate that you can’t drink potions in the middle of a fight but this book doesn’t say that so in a particularly difficult battle when you are down to 1 or 2 STAMINA you can use the Potion of Strength to fully heal yourself. There’s two doses per potion so you can do this twice. Even if you have high SKILL and STAMINA, this potion might be useful in the unlikely event that your dice are bad and you are losing fights that you would expect to easily win.
The Potion Of Fortune is a good choice particularly for characters with initial LUCK 12. This provides for testing your luck 6 times in a row with 100% chance of success – testing your luck with LUCK 12 is a guaranteed success and takes your LUCK down to 11. Then you drink the first dose of your potion increasing your LUCK to 13. You can now test your LUCK twice more taking your LUCK down to 11 again. Drink the second dose increasing your LUCK to 14 and you can now test your LUCK 3 more times before it goes down to 11.
Testing Your Luck In Combat
A useful tip for slightly improving your odds in combat is that when facing opponents whose STAMINA is an odd number then there is no harm, aside from the loss of a LUCK point, in Testing Your Luck the first time you inflict any damage. If for example you are facing a STAMINA 9 opponent then without Testing Your Luck you’ll need to hit it 5 times to kill it. If you Test Your Luck successfully then you’ll do an extra 2 points of damage reducing it to STAMINA 5 and so only 4 hits overall are needed to kill it. If your Test Your Luck roll fails you’ll only do 1 point of damage reducing it to STAMINA 8 so a total of 5 hits are required to kill it. So passing the Test Your Luck roll means you need 1 fewer hits to win the fight but failure doesn’t change the number of hits required.
Against enemies with even STAMINA failing the Test Your Luck roll will increase the number of hits necessary to kill the enemy so a low LUCK character might not want to take the risk.
Provisions
At certain points in your quest you will be given the opportunity to eat Provisions. You start off with 10 Provisions which is plenty so you should always eat whenever you are given the chance unless you are already at full STAMINA.
The Adventure
There are four distinct sections to the adventure. The outer chambers comprise two sections. The first section is a mostly linear journey through an area inhabited by orcs and goblins. This is followed by a section where there is a lot more branching of paths and more variety of enemies but ultimately all routes will lead to the same crossing point at an underground river.
Across the river lie the inner chambers. The first section of the inner chambers is infested with the undead. Beyond that section lies the Maze of Zagor at the end of which is the Warlock himself.
Now on with the walkthough itself. Paragraph numbers will be given as red numbers in square brackets.
The Outer Chambers Part One
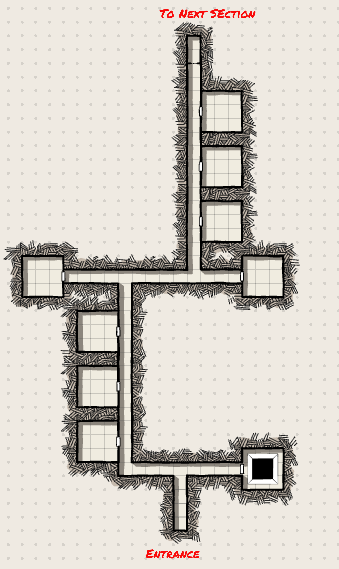
[1] On entering the tunnel into the mountain you’ll find a junction where you can head east or west. Head west here. Heading east will bring you to a room containing a pit trap and then you’ll have to turn back and go west anyway.
[71] There’s an orc guard asleep at his post at a corner where the corridor turns to the north. You’ll have to Test Your Luck to try to sneak past. Failing will wake the guard and you’ll have to fight but he is only SKILL 5 STAMINA 4 so it’s an easy fight even for a hero with minimum stats.
There are three doors leading off the corridor.
[301] The first door leads to a room with another sleeping orc guard. Testing Your Luck lets you steal a box containing a single gold piece. Fail and you’ll have to fight the guard but it’s another easy fight (SKILL 5 STAMINA 4). You’ll gain 2 LUCK which will restore the LUCK you’ve lost from Testing Your Luck to steal the box to sneak past the sentry earlier. A SKILL 7 character might want to skip this room – one gold piece won’t make any difference to anything and you’ll regain a point of LUCK in the next room anyway.
[208] The second door leads to a room that is empty apart from a small box. You must investigate the contents of this box. It contains a snake which will attack you (SKILL 5 STAMINA 2) and also a key marked “99”. This key is essential to completing your quest. You’ll also gain a point of LUCK so if you skipped the first room then you will be back up your initial LUCK score.
[363] The third door leads to a room with a couple of drunk orcs. They are SKILL 5 STAMINA 4 and SKILL 5 STAMINA 5 but you get a +1 bonus to your attack rolls due to their drunken state making them effectively SKILL 4. Even a SKILL 7 character will probably kill them both with minimal loss of STAMINA. Search the room and you’ll find a box containing a book that tells you how to cast a Dragonfire spell to fight evil dragons. You can complete this quest without acquiring this spell but it lets you avoid one of the toughest fights in the book so it is highly recommended that you visit this room.
[42] The corridor will lead you to a junction where you can go east or west.
[257] You’ll have to head east eventually but going west first will lead you to the Orc Chieftain’s room where you can fight him and his servant. He has a chest containing some gold, a potion of invisibility and a glove. You don’t need any of this stuff – the glove is useless and the potion is helpful in the final fight against the Warlock but there are better options to defeat him. Having the gold from this room will let you take the safest route across the underground river but it’s not too dangerous to get across without the gold. Also the chest is trapped so you’re going to lose D6 STAMINA. This won’t matter much for a strong character but a SKILL 7 STAMINA 14 character is likely to have lost a significant chunk of STAMINA in the fight and might even get killed by the trap. You can eat Provisions here which on average will negate the effects of the trap. You’ll then return to the junction and head east.
[113] Heading east from the junction will lead you another junction where you can go north or carry on east.
[78] You’ll have to head north eventually but heading east first will lead you to a kitchen with five orcs. They are an easy enough fight even for a weak character although you might want to avoid this room if you have suffered a lot of damage in earlier fights. A high SKILL character will probably kill them all without any trouble. A SKILL 7 character is likely to take some damage. You’ll gain a bonus of +5 STAMINA when you defeat them however which will probably negate all or most of the damage suffered in this fight. Searching the room you’ll find the Giver Of Sleep bow. You’ll then return to the junction and head north.
Heading north from the junction will take you down a corridor with three doors leading off.
[285] The first door is locked. You’ll need to roll equal to or less than your SKILL to break down the door otherwise you’ll lose 1 STAMINA and have to proceed up the corridor. In the room is a crazy looking old man. You can kill him if you are a psychopath but if you talk to him he will give you some clues and you’ll gain 1 LUCK. The most important thing he will tell you is about a trap nearby where there are 2 levers to open a portcullis. The left hand lever is trapped. A particularly weak character might want to skip trying to get into this room to avoid the risk of losing STAMINA.
[314] The second door is again locked and you’ll need to roll against your SKILL to open it, or lose a point of STAMINA if you fail. In the room is a golden shield. The shield will allow you to roll a D6 every time you are hit in combat and if you roll a 6 then it reduces the damage you take by 1 point. This is highly unlikely to make a difference to a character with high SKILL but it might help a low SKILL character. One problem is that you have to leave an item of equipment behind if you want to take the shield. This is a bit nonsensical – there are no rules in the book for what happens if you discard your sword, leather armour or lantern so we have to assume that you need to discard an item that you have found so far. This could be the potion or glove from the chieftain’s room, or the Giver Of Sleep bow from the kitchen. None of those items are important anyway. Quite why you can’t pick up the shield if you haven’t found any items to discard is anyone’s guess. If you have an item that you can discard then cross it off your equipment list and take the shield. A character playing strictly by the rules who has chosen to avoid the Orc Chieftain’s room and the kitchen full of orcs will have nothing to discard and shouldn’t bother trying to get in this room.
[300] The third door leads to a torture chamber where you can fight a couple of goblins and find a piece of cheese. The goblins don’t present much of a challenge so you might want to kill them just because you can but you can skip this room if you like. There is an encounter where the cheese is helpful but it’s not on the route that you must take to complete the adventure.
[303] Further up the corridor is a portcullis which you’ll need to open by pulling one of two levers. Pull the right hand lever – the left hand one is trapped and you’ll lose SKILL points if you pull it.
You’ve now made it through the area guarded by the tribe of orcs and goblins.
The Outer Chambers Part Two
The area through which you have just travelled has a linear structure so you can’t really go wrong as you entered the room with the snake. The area beyond the portcullis however has a branching structure. There’s one particular room that you must visit and you can’t back track much so choosing the wrong direction to go in at some junctions is game over although you wouldn’t necessarily know that you’ve failed until the end of the adventure.
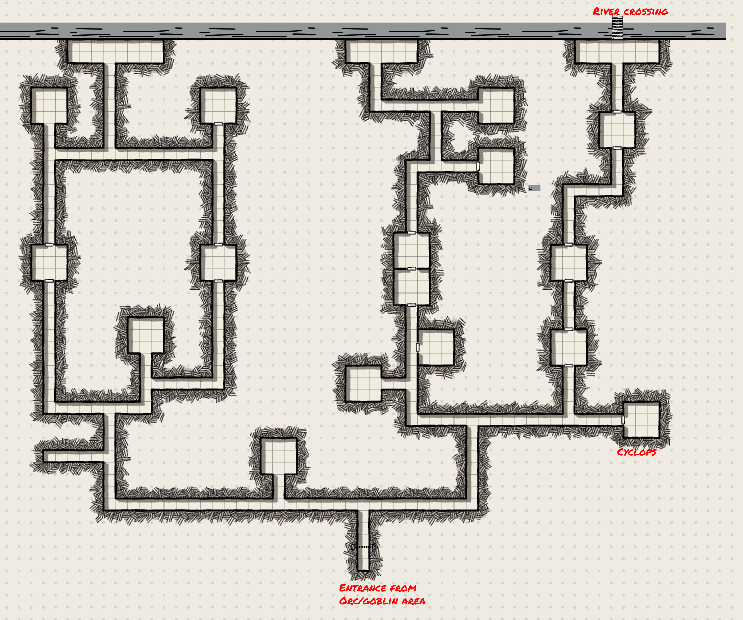
[128] Just past the portcullis is a junction where you can go east or west. You must go east here.
[58] The corridor will bend around to the north and there’s an enchanted resting place where you can eat Provisions. There’s a tough fight coming up soon so eat if your STAMINA is currently below it’s initial value. You’ll gain 2 extra STAMINA in addition to the 4 that you normally gain from eating Provisions.
[367] The corridor will lead you to another junction where you can go east or west. Again you must go east.
[323] At the next junction you can go north or east. Yet again you must head east.
[255] Heading east will bring you to a room with an iron statue of a cyclops with a jewelled eye. Try to take the eye and the cyclops will predictably come to life and attack you. This is by far the toughest fight of the game. The Iron Cyclops is SKILL 10 STAMINA 10 and you must defeat it. For a SKILL 12 character this won’t be much trouble but lower SKILL characters can expect to take some damage. SKILL 7 or 8 characters will probably die but see the notes at the end of this walkthrough with tips for how to get through with characters with low stats. Kill the cyclops and you get to take Eye Of The Cyclops jewel and a key marked “111”. You’ll also gain 3 LUCK so it’s worth Testing Your Luck a couple of time in the battle if you have a high LUCK score. The key is essential to your quest and the jewel, while not essential, is very useful. Remember to eat Provisions here if you have been injured.
There’s no other way out of this room so you’ll return to the last junction and head north.
[8] The corridor north will take you through a room where you get attacked by a Barbarian (SKILL 7 STAMINA 6). SKILL 7 or 8 characters would be best off taking the option to escape. It’ll cost 2 STAMINA but you’d probably lose more than that fighting him. There’s a mallet and some stakes on the floor which you can take if you wish although they are not necessary. That’s a not so subtle hint as to the nature of one of the monsters you might meet later on…
[189] Carrying on north you’ll come to a room with some paintings on the walls. Doesn’t really matter what you do here but if you choose to investigate the paintings you’ll find that one of them is of Zagor the Warlock. The painting appears to be watching you and the fear you feel will cause you to lose 1 SKILL. If you choose to hold the Eye Of The Cyclops up to the painting then the face in the painting will look like it is in pain and it stops staring at you. You’ll then regain the SKILL point you just lost. And you’ll know that the Warlock really doesn’t like the Eye Of The Cyclops for some reason. This might be useful to know later on…
[90] Leaving the art gallery will take you along a corridor where there is a spot to rest and eat Provisions.
You’ll continue on your journey north through another room which is empty apart from some bits of junk. Don’t bother investigating. There’s a bit of old rope that will come alive and attack you. There’s also a piece of wood which you can take with you. It doesn’t do anything.
Continuing your journey north will bring you to the riverbank.
Crossing The River
[218] There are a number of different ways to cross the river, any of which can get you across with varying degrees of danger. There’s also opportunities to eat Provisions depending upon which route you take.
If you ring the bell, a Boatman will appear on the north bank and row over in a boat. If you pay the toll then he’ll take you across the river. If you can’t afford to pay you can just kill him and row across in his boat yourself but he’s a wererat (SKILL 8 STAMINA 5). Not the toughest of fights but a low SKILL character might not be in a fit state to fight if they were badly hurt fighting against the Iron Cyclops earlier.
Crossing the bridge has about a 58% chance of getting you across safely. You have to roll a D6 3 times in a row and not get a 6. If either of the first two rolls are a 6 then you’ll fall in the river, have to fight against piranhas (SKILL 5 STAMINA 5) and swim back to the south bank. If you fall in on the final dice roll then you get to fight a crocodile instead (SKILL 7 STAMINA 6).
You can just fight the crocodile to the death and then you’ll make it to the north bank gaining 1 SKILL and 2 LUCK however While you are fighting the crocodile you’ll notice a disturbance in the water nearby.
After three rounds of fighting the crocodile you have the option to see if whatever is causing the disturbance will be of any help to you. This is actually a school of piranhas. If you have hurt the crocodile then most of them will attack the crocodile and you’ll just need to defeat a few of the piranhas (SKILL 5 STAMINA 1). If you haven’t hurt the crocodile to see whether they mostly attack the crocodile or mostly attack you. If they mostly attack you then they are SKILL 5 STAMINA 5 instead of STAMINA 1. Even if most of the piranhas attack you then it’s still a safer option for a low SKILL character who might have been struggling against the crocodile. After fighting the piranhas you’ll reach the north bank where you’ll gain 1 LUCK and get to eat Provisions. Even a high SKILL character might choose the piranha route here rather than killing the crocodile themselves for the opportunity to eat Provisions.
Swimming across requires that you roll 2D6 and get equal to or less than your STAMINA. Fail on this roll and you’ll return to the south bank but you can eat Provisions before choosing how to cross the river again. A low STAMINA character can keep trying this eating Provisions whenever they fail until they succeed on the roll against their STAMINA. If you succeed you’ll get close to the north bank and have the option to either swim towards some eyes that are sticking out of the water, or to swim towards some turbulence. Heading to the eyes will lead to the enconter against the crocodile as detailed above. Heading towards the turbulence will get you in a fight against piranhas (SKILL 5 STAMINA 5) but you’ll end up back on the south bank where you can eat Provisions.
Even a SKILL 7 character can usually kill SKILL 5 STAMINA 5 opponents with little to no loss of STAMINA so you can just keep on attempting to swim the river and pick the option that leads to the piranhas and back to the south bank until you are back up to maximum STAMINA or have eaten all your Provisions at which point you can take on the crocodile to reach the north bank.
Crossing the river on the raft will require you to roll 2D6 and for the total to be less than or equal to both your STAMINA and your LUCK. If you succeed then you reach the north bank. Failing will result in you having to swim back to the south bank. You might get attacked by piranhas en route (SKILL 5 STAMINA 5) in which case you’ll get to eat Provisions when you arrive back on the south bank.
There is no single best option here, it depends upon your character’s stats and how much risk you want to take. The safest routes, albeit with no chance to eat Provisions, are to either pay the Boatman but you can only afford this if you have the gold from the Orc Chieftain’s chest, or to raft across but you need at least LUCK 12 and STAMINA 12 to guarantee success. The bridge might get you across safely but you might end up in the water fighting the crocodile or piranhas. The best rewards are from swimming across, either 2 LUCK if you kill the crocodile, or 1 LUCK and a chance to eat Provisions on the north bank if you kill the piranhas who are attracted to the fight with the crocodile.
North Of The River
[254] On the north bank of the river is a door to the north and a corridor heading north west, or you cna head east along the river bank to a boathouse.
[104] Take the door to the north which will lead to another door. Going through that door you’ll be ambushed and knocked unconscious causing a loss of 2 STAMINA. When you recover you’ll find yourself in a room full of zombies which you must fight. They are SKILL 7 STAMINA 6, SKILL 6 STAMINA 6, SKILL 6 STAMINA 6, and SKILL 6 STAMINA 5 so not the toughest of fights unless you are SKILL 7 but then you probably won’t have made it this far anyway. After the fight check out the dead body in the corner and take the sword and the silver crucifix. It’s rare in Fighting Fantasy Gamebooks to find ways to improve your SKILL but this sword is enchanted and will increase your initial SKILL by 2 which will make a huge difference in the remaining battles.
[205] The next room is a crypt. The safest course of action is simply to leave through the west door. There’s nothing that you need in this room.
If you want to kill more undead then investigate the room and you’ll meet a vampire. You can just fight it (SKILL 10 STAMINA 10) – it would be a tough opponent normally but with the SKILL bonus from the magic sword you acquired in the last room killing it shouldn’t be too risky unless your starting SKILL was really low. If you change your mind about fighting it then you can just leave if you have the silver crucifix.
If you have the mallet and stakes from the room where you met the barbarian then you can instantly kill it if you successfully Test Your Luck. Bad Test Your Luck rolls can get you instantly killed however so this isn’t recommended unless you have LUCK 12 or higher to guarantee success.
[37] Leaving the crypt via the west door you’ll come to a crossroads. West and south are both dead ends but if you head west you’ll meet some magical tools who are digging a tunnel. You’ll gain 2 STAMINA while you relax watching the tools so it’s worth the detour if you aren’t at full health.
[366] Heading north from the crossroads, the corridor will turn to the east and then you’ll come across an opening in the wall to the north. Heading east at this point will bring you to a door which you can not get through so you’ll have to go through this opening.
[286] You’ll find yourself in a room with some dead bodies on the floor. The safest approach is to either leave straight away, or search the first body which will gain you 5 gold pieces and 1 LUCK and then leave.
After searching the first body you’ll get the chance to search the third body instead of leaving. This body will turn out to be a ghoul which you must fight (SKILL 8 STAMINA 7). It will paralyse and kill you if it hits you 4 times which isn’t very likely – even the worst character should have a SKILL of 9 with their magic sword but there’s always a slim chance of things going wrong. You’ll get an extra 2 LUCK points and an opportunity to eat Provisions if you defeat it.
[197] Carrying on north the corridor bends round to the east and a portcullis will slam down behind you blocking your way back. The only way now is east into the Maze of Zagor…
Note that from the river bank there is an alternative route to the Maze Of Zagor but it is much more dangerous. Head north west from the river bank and you’ll find the Boat House keeper and his dog. Kill them and you’ll get the keys to the Boat House. Return to the river bank and head east. You’ll reach the boat house and can head through there, potentially having to fight a horde of skeletons and then passing through a room occupied by a wight. You’ll eventually come out in the corridor with the opening to the north leading to the room with the ghoul and the dead bodies. This route is not recommended as the fights are more dangerous than facing the zombies and you miss out on the magic sword that increases your SKILL.
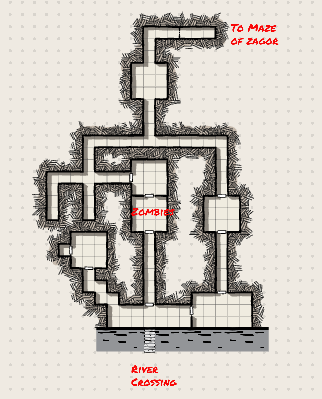
The Maze Of Zagor
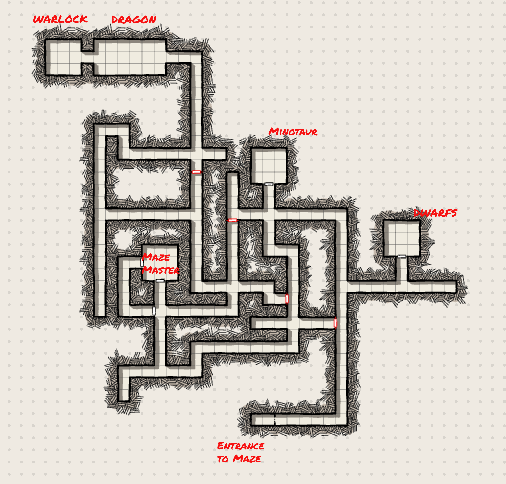
This area isn’t really that difficult but it is very easy to get disorientated and find yourself wandering around in circles if you haven’t got a map. There are secret doors in some of the walls, and dead ends where if you investigate the dead end you’ll feel dizzy and then find yourself in a different part of the maze. Searching for secret doors in areas where there aren’t any can result in you having to fight a random wandering monster too. Don’t bother looking for secret doors or investigating dead ends except where specified.
As this area allows for backtracking you can take many different routes through the maze besides the route outlined below. The only essential is that you visit the room with the minotaur before heading north along the corridor that will lead to the dragon’s lair.
Leaving the portcullis behind you you’ll head east and then the passage bends round to the north…
[52] A north south corridor with a side passage to the east.
Head east to another junction.
[291] An east-west corridor with a side passage to the north.
Head north to a door and enter the room.
[227] You’re now in a room with some friendly dwarfs playing cards. You can join in the gambling if you like but it is a bit pointless as there’s not a lot you can do with more gold. Or just chat to them and have an opportunity to eat some Provisions although you’ll only gain 2 STAMINA as you share the food with your new friends. If you’re a psychopath you can kill them all but there’s nothing to be gained from doing so.
Retrace your steps south out of the room and then west to get back to the corridor you were on before.
[52] A north south corridor with a side passage to the east.
Head north and the corridor will bend round to the west and bring you to a crossroads.
[308] A crossroads.
Head north from here.
[179] You’ll enter a room where you get attacked by a minotaur. Kill the minotaur (SKILL 9 STAMINA 9) and you’ll find another key numbered 111. It doesn’t matter how badly hurt you are after this fight, this was the last encounter where you must resort to violence.
Return to the crossroads [308] and head south. The corridor will turn east and then south and you’ll reach another crossroads.
[267] A crossroads.
Head south again. The corridor will turn west, south and west again and you’ll reach another junction.
[246] An east-west corridor with a side corridor to the north.
Head north to another junction.
[329] A north-south corridor with a door to the north, a door on the west side of the corridor and a side passage to the east.
Optionally head north and you’ll find a room with an old man called the Mazemaster. Threaten him and he’ll talk to you and give you some vague directions which are of no use whatsoever. Leave by the south door and return to the junction you were just at.
Head east. The corridor will bend around to the north and bring you to a crossroads.
[359] A crossroads.
At the crossroads head west. The corridor will bend round to the north and you’ll come to a junction.
[256] A north-south corridor with a side corridor going to the west.
Head north to a dead end.
[187] At the dead end you’ll find a knob that you can push or pull. Push it and a secret door will open allowing you to proceed north to a crossroads. Or pull the knob first and have a pointless fight with a wandering monster.
[85] A crossroads.
Head north at this crossroads. The corridor will go into a large cavern… congratulations, you’ve made it through the Maze Of Zagor.
Finale
[106] In the cavern you’ll encounter a dragon (SKILL 10 STAMINA 12). If you’ve made it this far then you’ve got a good chance of being able to kill the dragon but the risk free option is to use the Dragonfire spell you found in the orcs’ rooms near the start of the adventure to force the dragon to retreat and avoid the fight.
[274] In the next room there’s an old man playing cards. Enter in whatever manner you choose, the old man will reveal himself to be the Warlock anyway. There are a number of ways to fight the Warlock. A very high SKILL (13 or 14) character can easily defeat the Warlock in combat.
If you choose to look around the room for something that might help and successfully Test Your Luck then you’ll remember one of the rumours about where the Warlock’s power comes from. You’ll have to fight him but he will be a lot weaker.
If you have the Potion Of Invisibility from the Orc Chieftain’s room then you can fight the Warlock while invisible which will grant you some significant bonuses in the fight.
You could try throwing a piece of cheese at the Warlock but he isn’t lactose intolerant so this won’t help you.
Or if you remember the art gallery room and how the painting of the Warlock reacted when you showed it the Eye Of The Cyclops jewel then you might want to try using it against the Warlock himself if you fancy a completely risk free way to defeat him.
With the Warlock dead the only thing left to do is to open his treasure chest. You’ll need 3 numbered keys which are key 99 from the room with the snake near the start of adventure, and two keys both numbered 111. One of those you will have taken from the Iron Cyclops and the other from the room where you slew the Minotaur.
Congratulations, the Warlock is dead and you’ve stolen his treasure.
Getting Through The Game With Poor Stats
As mentioned in the introduction, Warlock of Firetop Mountain is not the easiest adventure to get through if you have poor stats despite what the book says.
There are only a few mandatory fights:
Snake (SKILL 5 STAMINA 2)
2 Drunk Orcs (effectively SKILL 4 STAMINA 4 and SKILL 4 STAMINA 5) or Dragon (SKILL 10 STAMINA 12)
Iron Cyclops (SKILL 10 STAMINA 10)
Barbarian (SKILL 7 STAMINA 6) – Avoidable at the cost of 2 STAMINA
Zombies (SKILL 7 STAMINA 6, SKILL 6 STAMINA 6, SKILL 6 STAMINA 6 and SKILL 6 STAMINA 5) – Strictly speaking it is not mandatory to face the zombies but the alternative route is much worse.
Minotaur(SKILL 9 STAMINA 9)
In addition to these, depending upon dice rolls you might have some other foes to fight:
Orc Sentry (SKILL 5 STAMINA 4) – Avoided if you Test Your Luck
Most of those fights are pretty easy even for a character with SKILL 7 STAMINA 14 and LUCK 7. The big problem is the Iron Cyclops. Ignoring draws the Cyclops has 986/1192 or 83% chance of winning each combat round.
Assuming no Testing of Luck and no golden shield, the Cyclops wins 97% of the time.
With the shield this drops to about 96% but for a SKILL 7 character there’s a 42% chance that you won’t manage to break into the room with the shield in the first place
The best case scenario to defeat the Cyclops is to drink the Potion Of Strength in the middle of the fight. Assuming that you did get the shield and it is effective on 1 out of every 6 attacks, you can expect to survive 7 hits from the Cyclops taking you down to 1 STAMINA. Then drink the Potion Of Strength to get back up to 14 STAMINA. There are 2 doses in a potion so you can do this twice resulting in the Cyclops hitting you 14 times after which your potion is gone, then another 8 times to kill you. He still wins 52% of the time.
Even if you somehow managed to kill the Cyclops then you’ll probably get killed by the zombies north of the river.
A mediocre character with SKILL 9 and STAMINA 19 will win 66% of the time without the shield or potions.
If you have high LUCK and can successfully test your luck twice when scoring hits on the cyclops (guaranteed success if you start with LUCK 12 and drink a potion of fortune to get up to LUCK 13) then the fight gets much easier.
With SKILL 10 STAMINA 19 you have a 91% chance of winning the fight against the cyclops without the aid of the Golden Shield, Testing Your Luck, or Potions Of Strength.
Leave a Reply